Logo
15/07/2026
PowerStamper
PowerStamper 1.0 - PhotoShop Tutorial
Download PowerStamper Tutorials Scenes.
This tutorial covers the basic steps to create and paint an image in PhotoShop that can be stamped onto a 3d model using PowerStamper.
In this tutorial we will use Adobe PhotoShop to paint an image that will be used to stamp the eyelashes into the material bitmap of a head model.
Creating the Stamping Image
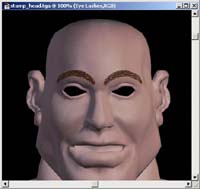
- Open the file BigHead.max and Render the Camera viewport.
The file has a head model, with a Skin material and a single UVW Channel. The UVW channel was created using Unwrap UVW to unwrap a spherical mapping channel and export it to a new UVW Frame, and using Edit Mesh, Relax and Push modifier the exported UVW Mesh was flattened and organized.
- Select the BigHead object, go to the Utilities panel and click the More
button. Select PowerStamper from the list.
- The first thing we need to do is to set the stamping image filename and size. This file
will be rendered and saved by PowerStamper, and is the same image we will modify in
PhotoShop to add details.
Click the Stamping Image button and set the name as stamp_head.tga.
In the Set Stamping Image Size set the size to 800 × 600.
- Now, click the Render button below the Stamping Image button.
A new image is rendered and saved to the filename you set above.
- Open PhotoShop, and open the file stamp_head.tga
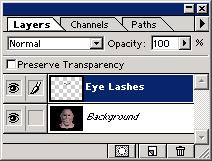
- Create a new layer. This layer is where we will paint the eyelashes.
We paint on a new layer because in a later step we will use this layer's transparency to create the alpha channel that will be used to stamp only the eyelashes.
- Using your PhotoShop skills paint a couple of eyelashes in the eyebrows.
- Load the Layer's transparency as selection:
Go to Select > Load Selection and in the dialog box set the Source Channel to the layer's transparency (Eye Lashes Transparency).
- Create the alpha channel from the current selection:
Go to Select > Save Selection. If you saved stamp_head.tga as a 32 bits bitmap, replace the current alpha channel setting Channel to Alpha 1. If not, just save the selection as a new channel.
It is very important that you end up only with one alpha channel, so remove all channels that are not the eyelashes selection.

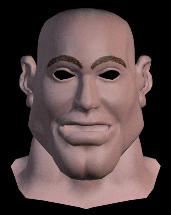
- Remove the background:
The last step is to remove the background, so any of the rendered skin colors will be stamped into the final skin detail bitmaps.
To do so, fill the Background with a black color.
- Finally, save the head_stamp.tga image as a 32 bits bitmap. You can use Save a Copy... or
Flatten all the layer and save the image.
- Go to 3d studio max and with the ViewFile utility check out that the stamp_head.tga image
is the one you just modified in photoshop.
- Since all the masking will be done by the stamping image alpha channel, we don't need to
smoothly attenuate the stamping image using the surface normals, we just need to make sure that
the eyelashes are stamped in the front, and not in the back of the head.
Set the angle start, and angle end to 90°
- Make sure that Premultiplied Alpha is unchecked since we are stamping using a black
background image with alpha masked details.
- Create the Output Bitmap:
Click the Output Bitmaps button, and in the dialog box, click the Set Output Bitmap and set the name to head_mat.tga. Set the size of the bitmap to 800 × 600.
Leave the MatID and the UVW as 1.
- Click the Stamp button.
- Apply the new bitmap in the diffuse channel:
In the Skin Material, diffuse channel, create a new Bitmap Map and set the bitmap to head_mat.tga.
- Render the scene using the 3d studio max Render button.
Cool Tips to try:
- PhotoShop supports actions, so it is a good idea that you set all the needed steps
to set up the stamping image into two actions:
Action 1: Create a new Layers.
Action 2: Load the selection from the layer 1 transparency. Save the Selection to the Alpha Channel. Fill with black the background color. Flatten the image.
- Unlike 3D Painting applications, in 3d studio max you can modify the mesh for every
stamping process to better expose the zones that you will paint.