Logo
15/01/2026
PowerStamper
Download
PowerStamper for 3dsmax 6, 7, 8, 9, 2008, 2009, 2010 and 2011.PowerStamper for 3dsmax 2012 - 2015.
PowerStamper Tutorials Scenes.
Source Code
In collaboration with maxplugins.de, Mankua has released the source code of TextureLayers, PowerStamper, UVWFrame and Stress as
open source.
PowerStamper source code at github.com/Mankua/powerstamper.
What is PowerStamper?
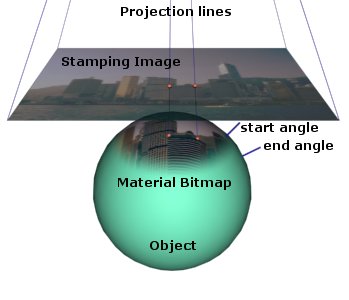
PowerStamper is a Texture Builder by Bitmap Projection. This means that an image is projected onto the 3D surface of a model, and stamped into its material bitmap textures.

The image is projected using the active viewport, which can be an orthogonal projection ( Top, Front, User) or a perspective projection ( Perspective, Camera, Spot Light ). The projected image is known as the 'Stamping Image' and the material bitmaps as the 'Output Bitmaps'.
As a Stamping Image you can use photographs to compose complex photorealistic materials for a 3D model; typical material maps to create unique 3D seamless unstretched maps, like rock or sand; or, you can paint rendered images to create complex 3D painted maps. Moreover, to get better results, you can mix all these three techniques!
User's Guide
PowerStamper is 3d studio max utility.
Utilities > More > PowerStamper

Selection Panel.
PowerStamper works with the selected object (or objects). It can only work with objects that can be rendered and have surface geometry. It can work with meshes, patches and NURBS. But it can't work with Shapes or NURBS curves, even if these have the rendered option activated.
Stamping Image Panel
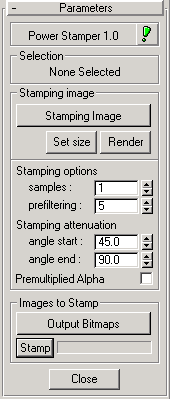
This is the image that PowerStamper uses to paint the material bitmaps. This panel gives you all the options you can use to render a new Stamping Image.
Stamping ImageImages to Stamp Panel:
This button displays the standard max 'Save Image' dialog box, and let you Select an existing image, or set the name for a new image.
Set Size
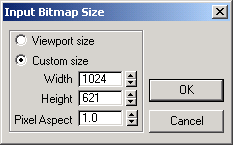
This buttons displays the Set Stamping Image Size dialog box. This dialog box let you adjust the size that PowerStamper will use to render the Stamping Image. If you check Viewport size the size of the active viewport will be used to render the new Stamping Image. This option is useful when you use PowerStamper with a 2D Paint application to create custom bitmaps.
Pixel Aspect: Use this spinner to adjust the pixel aspect ratio of the images. (This option is useful for working with NTSC or PAL video images)
Render
This button renders a new image from your active viewport. The rendered image is automatically saved to the Stamping Image filename and with the size set by Set Size.
Stamping Options:
Samples: This spinner controls the number of samples that are used to paint each pixel in the final output bitmaps. This value is similar to antialiasing when rendering.
Prefiltering: Bitmaps in material channels are filtered during rendering to create smooth antialiased textures. Prefiltering creates an external 'halo' around the stamped zones to avoid the presence of 'black lines' in mapping seams (where two or more uvw set of faces match together). By default this value is 5, but if you see black lines in your rendered models, set this spinner to a bigger value. It can safely be as big as you want!
Stamping attenuation:
PowerStamper uses a wide variety of masking techniques to let the user stamp the model only in certain desired zones:
Surface Normals Attenuation:
This is the only masking method you can set from the PowerStamper Utility Panel. This method uses the angle between the view direction (angle 0°) and the surface normal. The stamping Image is faded smoothly between the start angle and the end angle.
angle start: All geometry below this value will be painted.
angle end: All geometry above this value won't be painted.
Face selection Attenuation:
Just select some faces in Edit Mesh or Mesh Select, and only those faces will be stamped. If no faces are selected, all faces are stamped.
Camera Distance Attenuation:
Use Environment Ranges to attenuate the camera distance. The Show option in Camera > Environment Ranges should be activated to use this option.
Stamping Image Alpha Channel:
If the Stamping Image has an alpha channel, it is used to attenuate the projection.
Premultiplied Alpha: This option works very similar like in Bitmaps Texture in the materials editor. As a rule, if you stamping real photos with alpha channel (where there is no black background) turn on Premultiplied Alpha. If you are stamping black images with alpha masked details, turn off Premultiplied Alpha.
In this panel you set the options of the bitmaps you will stamp.
Output BitmapsBackup Images
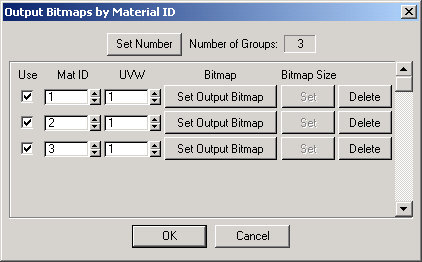
Since PowerStamper can stamp lots of objects in a single step, and each object can have multiple materials subdivided in materials IDs, it display an images manager dialog box where you can set up all the images you want to paint, and where you can reference them with a material ID, a UVW channel and the image size if the image doesn't exist.
Use: If this checkbox is not checked, this output bitmap is not stamped.
Mat ID: The material ID of the faces that will be use to stamp this bitmap.
UVW: The mapping UVW channel used to stamp this bitmap.
Bitmap: This button displays the typical Save Bitmap dialog box that lets the user set the filename with which the bitmap will be saved.
Delete Bitmap from HDD: This option is displayed when you right click the Bitmap button.
Bitmap Size: This button displays a dialog box that lets the user set the size of bitmaps that doesn't exist yet.
Delete: This button deletes all the group.
Stamp
The real action goes after you click this button. All selected objects are stamped using the stamping image. The stamping progress is shown in the progress bar beside the Stamp button, and this progress can be repeated various times depending on the number of objects you have selected, and on the number of groups each object has set.
To Cancel the stamping process, simply click the Esc button.
Since the stamping process can stamp and save more than one bitmap, by the time you click the Esc button, it is possible that some bitmaps have been saved.
Each time a bitmap is stamped, a backup of the file is saved in the same folder. PowerStamper keeps 3 backup files, which are organized with a _0x number before the extension (ie. bitmap_00.tga bitmap_01.tga bitmap_02.tga) where _03 is the oldest stamped image!
Tutorials
Global TexturesPowerStamper and PhotoShop
PowerStamper and PaintShopPro
Camera Mapping
Links
ReviewGallery

